How to Track GST Refund Status Online
RFD-01 is the application to be filed for the online processing of refunds under GST. Once the application has been filed, it takes 60 days for the GST officer to process the refund application. It is crucial for taxpayers to track the status because if any notices are issued by the department against your application, they are displayed in a separate section of the GST portal, requiring your tax teams to manually check multiple sections across the portal. This article explains how you can track the status of the refund, so you can take any action, if required, beforehand.
Track Refund Application Post-Login to the GST Account
1. Visit the GST Portal and login to your account with valid credentials.
2. Go to ‘Services’ -> ‘Track Application Status’.

3. Select the ‘Refunds’ option from the drop down list once the track application status page is displayed.

4. Select the relevant financial year for which the refund application was filed.

5. List of ARNs of refund applications filed in that year are displayed.
Note:
- You can click the ARN hyperlink to download the Refund ARN receipt in PDF format.
- You can click the Action/Status hyperlink to view the Refund ARN details.

5.1 Once the Personal Hearing Notice is issued by the Tax Officer, the following message will be displayed.

5.2 When refund amount is partially sanctioned in Rectification of RFD-06 order, following message will be displayed.

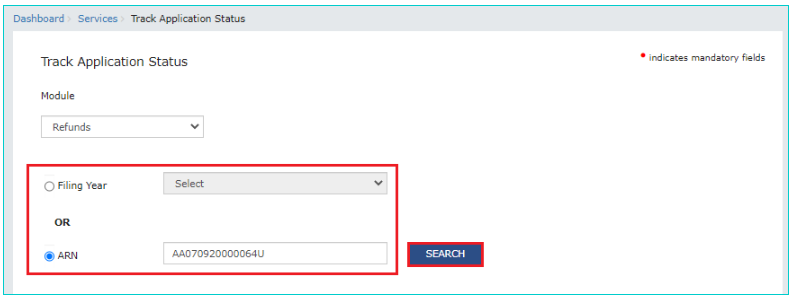
6. In case of ARN, enter the ARN of refund application and click the 'Search' button.

7. Detailed status of the Refund Application ARN is displayed.
Note:
- Stages are color coded according to the current status of the application. For Example: If current status of the application is at Stage 3 then all stages till stage 3 will be depicted in green color and further stages will be greyed out.
- Details of the present status of the application is shown below the case history in Red Texts as shown in the screenshot below.
- You can view additional details of Tax Period and Tax Amount Claimed when you view the status of refund application after logging into the GST Portal.

- In the event the bank account validation has failed, there is an option to update the bank account by clicking on the button ‘Update Bank Account’.

9. A page will be displayed to update the bank account details. After selecting the relevant account number, click on ‘Proceed’.
Note:
- You can either select a different Bank account from the drop-down list or add the new Bank account/ rectify the details for existing bank account by filing the non-core amendment application of registration and then update the Bank account from here.
- Bank account will be validated again and disbursement of refund amount will be credited to the account selected here. The refund application form will be updated with a new Bank account along with a reference number.

9.1. A warning will pop-up on the screen asking if you are sure to update the bank account for that particular ARN, click on ‘Proceed’.

10. Click on the check-box in the declaration field, select the authorised signatory and proceed to file with DSC/EVC.

11. An OTP will be sent to the registered mobile number which needs to be entered to confirm filing.

11.1. A warning will pop-up on the screen asking if you want to proceed with the updated bank details. Click on ‘Proceed’.

12. A message will pop-up at the top of the screen saying that the bank account is updated successfully.

Track Refund Application Pre-Login to the GST Account
1. Visit the GST Portal.
2. Go to ‘Services’ -> ‘Refunds’ -> ‘Track Application Status’.

3. Select the Refunds option from the drop down list once the track application status page is displayed.

4. Enter the ARN and click on ‘Search’. The search results will be displayed with information to the relevant refund claim.
Note:
- Stages are color coded according to the current status of the application. For Example: If current status of the application is at Stage 3 then all stages till stage 3 will be depicted in green color and further stages will be greyed out.
- Details of the present status of the application is shown below the case history in Red Texts as shown in the screenshot below.

5. To view further details or take action, you may login to your GST account.
Track Refund Status for IGST Paid on Account of Exports of Goods
1. Visit the GST Portal and login with valid credentials.
2. Go to ‘Services’ -> ‘Refunds’ -> ‘Track status of invoice data to be shared with ICEGATE’.

3. Select the relevant financial year and the month for which the refund application was submitted, and click on ‘Search’. The search results will be displayed.

Note: For quarterly filers, select the last month of the quarter.
4. To get the details of invoices which have not been transmitted to ICEGATE and invoices which have been rejected by ICEGATE, click on the number of invoices which is hyperlinked under the ‘Count’ column.

5. Click on ‘Download Failed Invoices’ in order to view the validation errors and take the necessary corrective action.


