|


How to Register for GST India Online – Guide for GST Registration Process Online
GST Registration process is online based and must be carried out on the government website gst.gov.in. The Ministry of Finance (MoF) has simplified the GST registration process to ease the tax filing process. Every dealer whose annual turnover exceeds Rs.20 lakh (Rs.40 lakh or Rs.10 lakh, as may vary depending upon state and kind of supplies) has to register for GST.
Latest updates
17th April, 2025
The CBIC has issued new instructions regarding the processing of GST registration applications. The instructions aim to streamline the process and eliminate unnecessary document requests. They clarify the acceptable documents for proving the principal place of business and the constitution of the business. They also address concerns regarding physical verification and the timely approval of GST registrations.Key Highlights include:
- A list of documents for proof of principal place of business has been outlined.
- Officers are advised not to ask for unnecessary documents, such as the PAN or Aadhaar of the lessor.
- Registration applications must be processed within the set timelines.
12th February 2025
The GSTN has released an advisory regarding new Aadhaar and biometric authentication requirements for GST Registration. Applicants are divided into three categories:
- Applicants not opting for Aadhaar authentication
- Applicants opting for Aadhaar Authentication with biometric verification required
- Application Reference Number (ARN) non-generation
Applicants must adhere to the advisory's instructions. For further information, please click here.
10th July 2024
1. The CBIC notified via CGST notification no. 13/2024 dated 10th July 2024 that biometric-based Aadhaar Authentication for GST registration, earlier implemented on a pilot basis in Gujarat and Puducherry, has now been extended to the whole of India.
2. Further, the CBIC released CGST notification no. 12/2024 dated 10th July 2024 stating that in cases where applicants do not opt for Aadhaar Authentication, they must submit a photograph of the individual applicant or such individuals in relation to the applicant and get the original documents verified at one of the designated facilitation centres.
Here is a step-by-step guide on how to complete registration process online on the GST Portal–
Steps to fill up Part-A of GST Registration Application
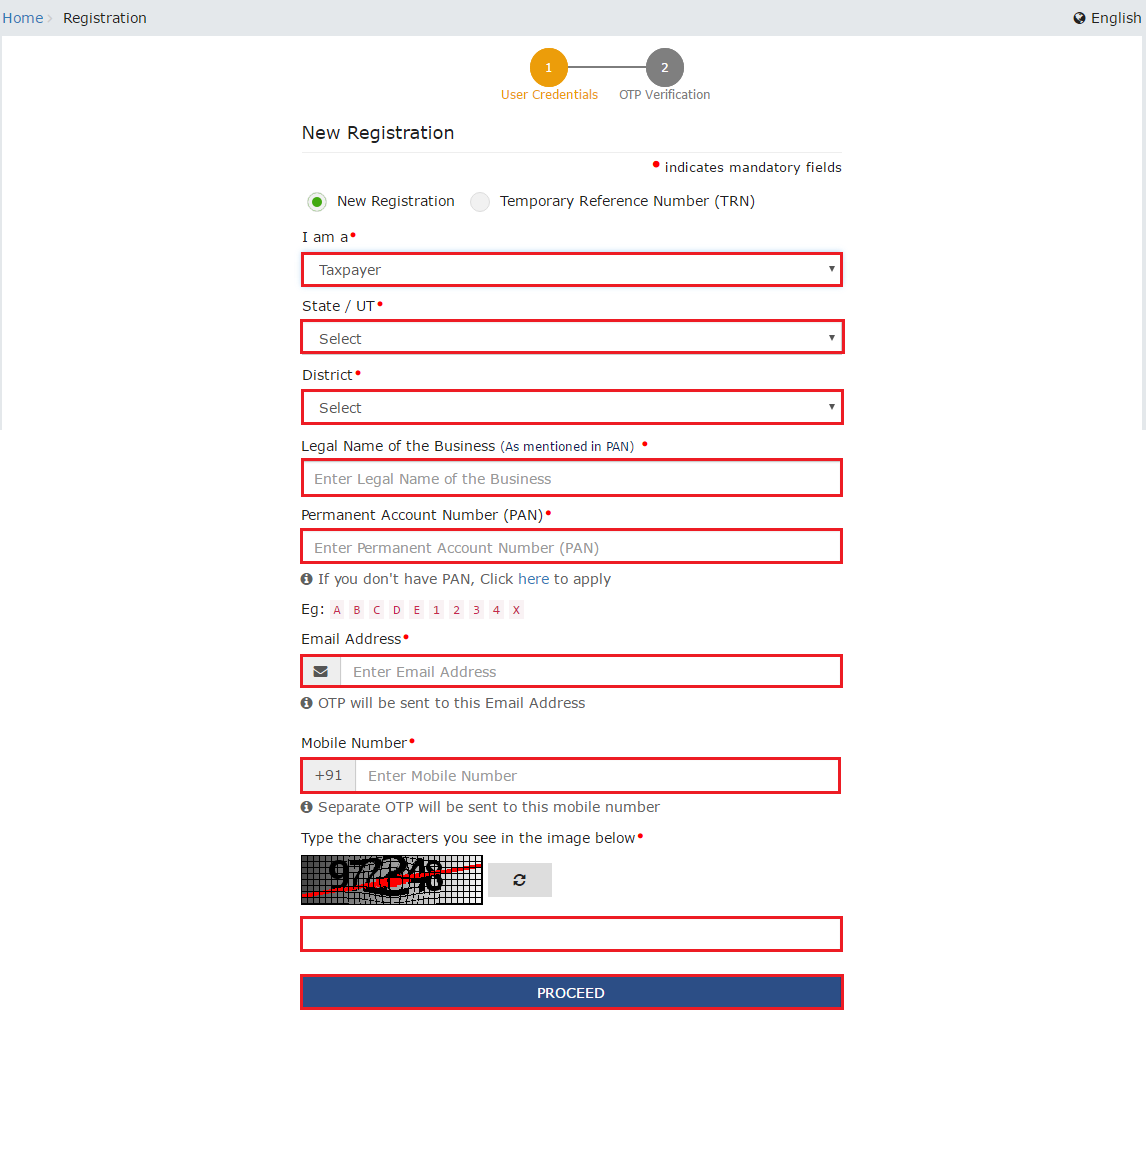
Step 1 – Go to the GST portal.
Click on Services. Then, click on the ‘Registration’ tab and thereafter, select ‘New Registration’.

Step 2 – Generate a TRN by entering the following details in Part A and Completing OTP Validation
- Select New Registration radio button
- In the drop-down under ‘I am a’ – select Taxpayer
- Select State and District from the drop down
- Enter the Name of Business and PAN of the business
- Key in the Email Address and Mobile Number. Please note that you don't have to enter your email id and mobile number if your contact details are linked with PAN.
- You will receive OTPs on the registered email id and mobile number or PAN-linked contact details, as the case may be.
- Click on Proceed
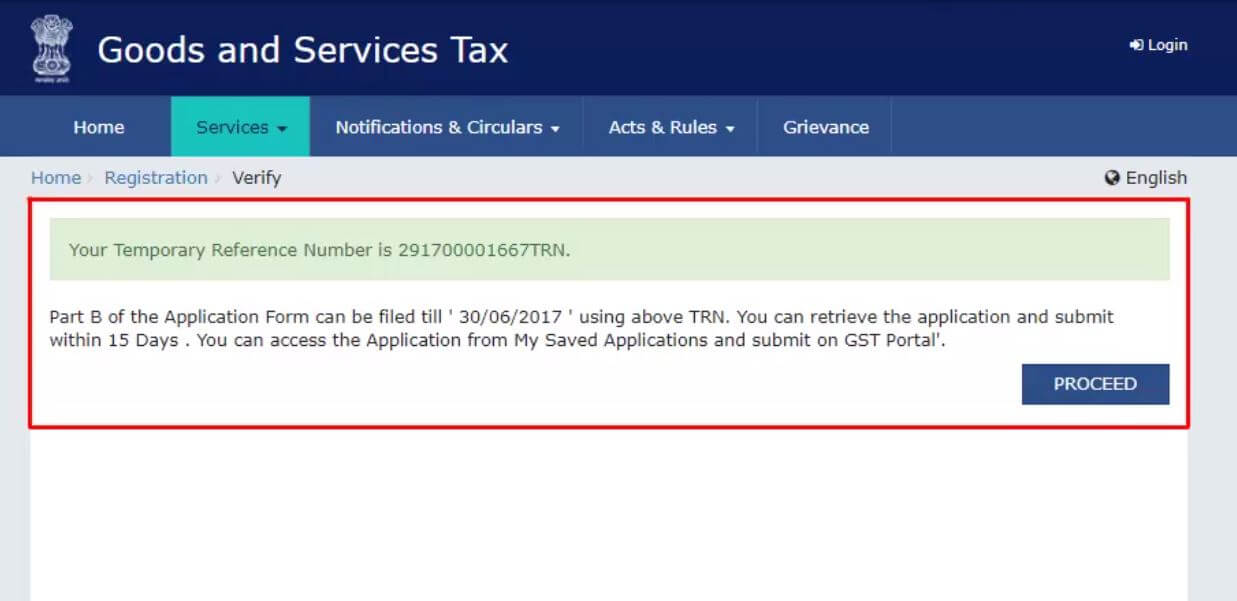
Step 3 – OTP Verification & TRN Generation
Enter the two OTPs received on the email and mobile or the PAN-linked contact details. Click on Continue. If you have not received the OTP click on Resend OTP.

Step 4 – TRN Generated
You will receive the 15-digit Temporary Reference Number (TRN) now. This will also be sent to your email and mobile or PAN-linked contact details. Note down the TRN. You need to complete filling the part-B details within the next 15 days.
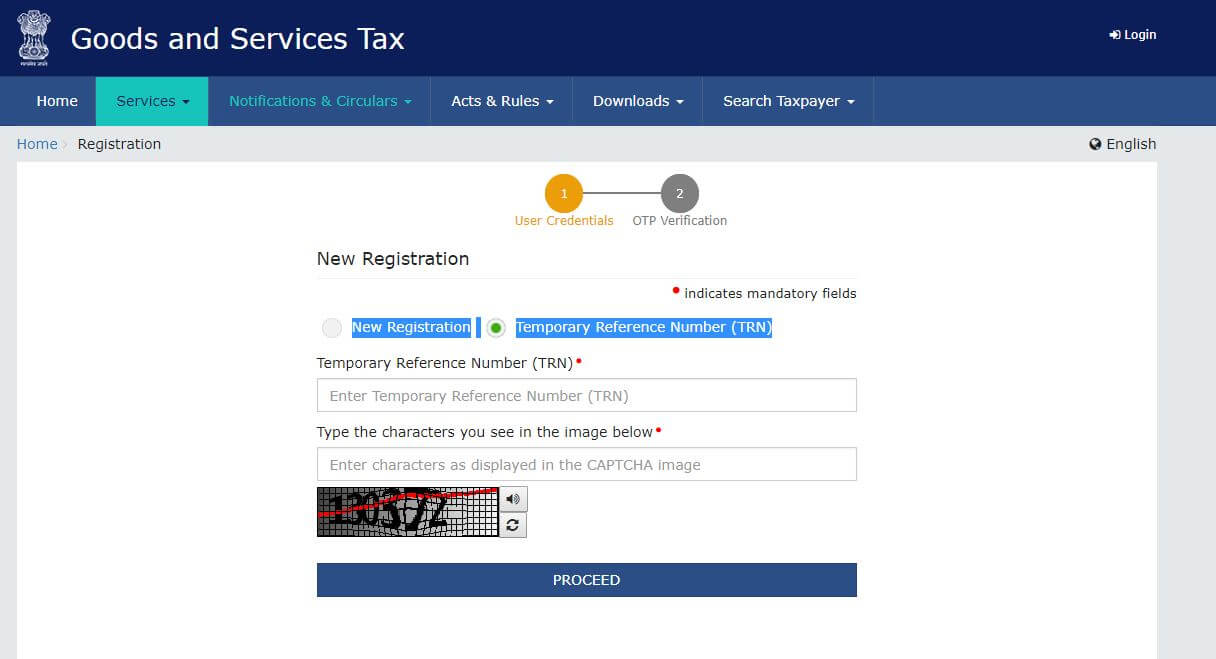
Step 5 – Log in with TRN
Once again go to the GST portal. Select the ‘New Registration’ tab. Select Temporary Reference Number (TRN). Enter the TRN and the captcha code and click on Proceed.
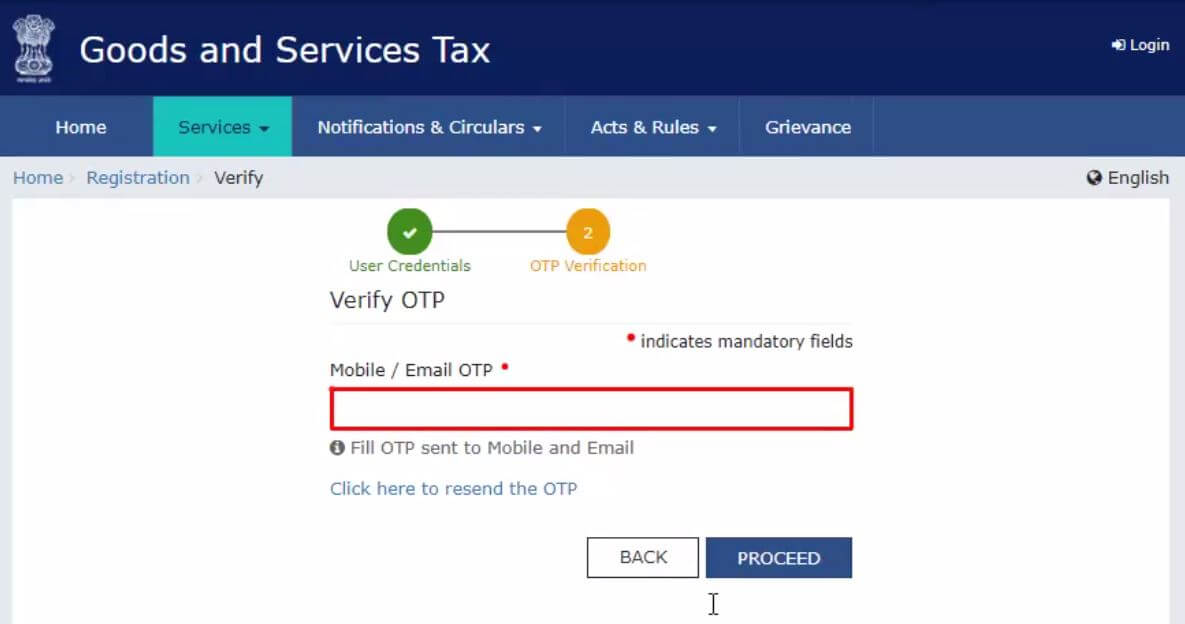
Step 6 – OTP Verification
You will receive an OTP on the registered mobile and email or PAN-linked contact details. Enter the OTP and click on Proceed
Step 7 – Checking Application Status
You will see that the status of the application is shown as drafts. Click on Edit Icon.

Steps to Fill Part-B of GST Registration Application
Part B has 10 sections. Fill in all the details and submit appropriate documents. The Aadhaar authentication section was added and the bank account section was made non-mandatory in 2020.

Here is the list of documents you need to keep handy while applying for GST registration-
- Photographs
- Constitution of the taxpayer
- Proof for the place of business
- Bank account details*
- Verification and aadhaar authentication, if chosen
* Bank account details are non-mandatory at the time of GST registration since 27th December 2018.
For more information about documents required for GST registration, watch our video:
Step 8 – Submit Business Information
Under the Business Details section, enter the trade name, business constitution and district.
Note: Trade name is completely different from the legal name of the business.
Moving on, select ‘Yes/No’ to opt-in or out of the composition scheme, against the field- “Option for Composition”. Further, choose the type of registered person as manufacturers or service providers of work contract or any other person eligible for composition scheme.

Next up, enter the date of commencement of business and date from which liability arises. Also, select ‘Yes/No’ for type of registration as a casual taxable person and if ‘Yes’ is chosen, then generate the challan by entering the details for advance tax payment as per the GST law for casual taxable persons.

Further, under the ‘Reason to obtain registration, select the reason as ‘Input service distributor’ if that is the case, at this stage. Alternatively, many other options are available to choose from.

Based on the selection made, enter details in the fields that appear. For example, if you select ‘SEZ unit’, then enter the name of the SEZ, designation of approving authority, approval order number, etc. and upload the supporting documents.
In the Indicate Existing Registrations section, choose the type of existing registration such as Central Sales Tax, Excise or Service Tax, registration number and date of registration. Thereafter, click the ‘Add’ button.
Below screenshot shows the fields discussed above.

Once the details are entered, you notice that the tile turns blue in color indicating the completion of filling up details in that section.

Step 9 – Submit Promoter Information
Under the Promoters/Partners tab, you may enter the details of up to 10 Promoters or Partners.
Personal details such as name, address, mobile number, date of birth, email address and gender and identity details such as Designation / Status and Director Identification Number if the taxpayer is a company, whether or not an Indian citizen, PAN and Aadhaar numbers must all be entered.
Fill in the residential address and upload a photograph of the stakeholder. You are allowed to upload PDF or JPEG files with maximum file size for upload of 1 MB.
If the promoter is also the primary authorised signatory, then make the necessary selection. Click on the ‘SAVE & CONTINUE’ button to proceed.

Step 10 – Submit Authorised Signatory Information
Enter details of the Authorised signatory similar to the details entered for promoters/partners, in step 9.

In case of GST practitioner, enter the enrollment ID and in case of authorised representative, enter basic details as asked.

Step 11 – Enter Principal Place of Business details
The taxpayer’s principal place of business is the primary location within the state where he or she conducts business. The principal place of business is usually the address where the company’s books of accounts and documents are stored, as well as where the company’s president or top management is based.
Report the address, district, sector/circle/ward/charge/unit, commissionerate code, division code and range code. Also, enter the official contact number of taxpayer and nature of possession of premises as rented or owned or shared, etc.
Next up, upload supporting documents, including consent letter or NOC for business on premises rented out and upload the proof of SEZ Unit/SEZ Developer approval for the premises, if applicable. Also, checkmark the Nature of business activities in the premises and add any additional places of businesses. Click on the ‘SAVE & CONTINUE’ button.
Notes:
- To know jurisdiction, click on the hyperlink available in that section. To know the steps to check jurisdiction, refer to our page: Steps to find GST jurisdiction.
- If you are applying for registration as the IRP for undertaking CIRP of the taxpayer company, then provide details of original registration of that taxpayer (known as the corporate debtor).
- For multiple document upload, append all documents as a single file and upload it. The maximum file size is 1 MB and format allowed in either PDF or JPEG and maximum of two files can be submitted.


Step 12 – Submit details of goods and services along with the HSN or SAC codes
HSN or SAC codes for up to a maximum of 5 goods and 5 services on the top of your list need to be added.

The following screen appears for a composition scheme taxpayer.
Step 13 – Details of Bank Account
Next, enter the Bank details of the taxpayer for up to 10 bank accounts. Submission of bank accounts details has been made optional from 27th December 2018. If you do not report these details at the time of GST registration, then after GSTIN is granted, you will get a prompt upon logging in for the first time on the GST portal to file a non-core amendment application to submit the bank details.
Also, upload supporting documents together with the details.

Step 14 – State Specific Information
Enter the professional tax employee code number, PT registration certificate number and State Excise License number with the name holding the license. Click on ‘SAVE & CONTINUE’.

Step 15 – Aadhaar authentication
Next, choose whether or not you are willing to do Aadhaar authentication. Learn more about the process and options available from our page, “All you need to know about Aadhaar authentication and steps”.

Note that if the authorised signatory chose to go for aadhaar authentication, then physical verification of premise or site will not be required to be done by the officer, except in specific cases. In such cases, the ARN will be generated right after that is complete.
Step 16 – Verification of Application
Once all the details are filled in go to the Verification page. Tick on the declaration and submit the application using any of the following ways:
- Companies and LLPs must submit application using DSC
- Using e-Sign – OTP will be sent to Aadhaar registered number
- Using EVC – OTP will be sent to the registered mobile

Step 17 – ARN Generated
A message is displayed on successful application and Application Reference Number(ARN) is sent to registered email and mobile.

You can check the ARN status for your registration by entering the ARN in GST Portal.
Check now if GST registration applies to your business.
For easier and hassle free GST Registration opt for Clear Tax GST Registration services.
For more information on amendments to GST registration, read a host of articles by ClearTax:
Frequently Asked Questions
Clear offers taxation & financial solutions to individuals, businesses, organizations & chartered accountants in India. Clear serves 1.5+ Million happy customers, 20000+ CAs & tax experts & 10000+ businesses across India.
Efiling Income Tax Returns(ITR) is made easy with Clear platform. Just upload your form 16, claim your deductions and get your acknowledgment number online. You can efile income tax return on your income from salary, house property, capital gains, business & profession and income from other sources. Further you can also file TDS returns, generate Form-16, use our Tax Calculator software, claim HRA, check refund status and generate rent receipts for Income Tax Filing.
CAs, experts and businesses can get GST ready with Clear GST software & certification course. Our GST Software helps CAs, tax experts & business to manage returns & invoices in an easy manner. Our Goods & Services Tax course includes tutorial videos, guides and expert assistance to help you in mastering Goods and Services Tax. Clear can also help you in getting your business registered for Goods & Services Tax Law.
Save taxes with Clear by investing in tax saving mutual funds (ELSS) online. Our experts suggest the best funds and you can get high returns by investing directly or through SIP. Download Black by ClearTax App to file returns from your mobile phone.
Office Address - Defmacro Software Private Limited, C 245A, Ground floor, Room No 1, Vikas Puri, West Delhi, New Delhi, Delhi 110018, India
Cleartax is a product by Defmacro Software Pvt. Ltd.
ISO 27001
Data Center
SSL Certified Site
128-bit encryption