How to Upload JSON File in GST Portal
Have you ever faced errors while uploading a return in the GST portal or tired of entering invoices manually to file GST returns? Here is why the JavaScript Object Notation (JSON) utility can come to your rescue. This utility can help you file a large number of invoices at a time. Let us break down how to upload a JSON file in the GST portal step by step.
Key Takeaways
- JSON makes it easier to file GST Returns, helping businesses submit their tax information accurately and on time.
- To download JSON for GSTR-1 filing in the GST Portal, go to Returns Dashboard, select the return period and click on Prepare Offline, Download JSON.
- To download JSON for GSTR-3B filing, in the GST Portal, go to Returns Dashboard, select the return period and click on Prepare Online, download Draft GSTR-3B.
- To upload JSON in the GST Portal, in the GST Portal, under returns dashboard, select the return period and choose prepare Offline/Online for GSTR-1 or 3B.
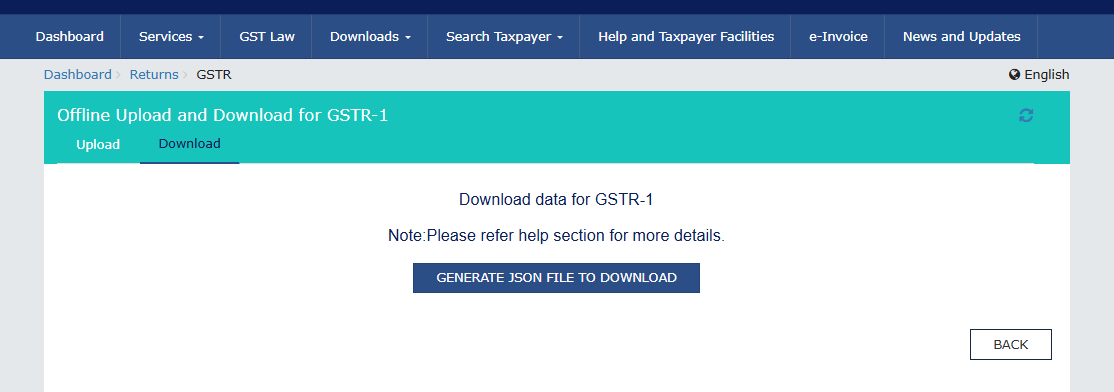
How to Download JSON File for GST Return Filing?
For GSTR-1
The following steps guide you through how to download a JSON file for GST Filing:
STEP 1: Head to the GST portal and log in with your username and password.
STEP 2: Scroll down to get returns dashboard - select Financial Year - Select Return period - Click Search.
STEP 3: Click on Prepare Offline - Download JSON.
The JSON File will now be downloaded to your system.
This JSON is primarily used for uploading to the GST Offline Tool and for importing data into Tally or other GST software.
For GSTR-3B
To download a JSON File from the GST Portal, you are required to follow the following steps:
STEP 1: Go to the GST portal www.gst.gov.in and log in with your username and password.
STEP 2: Go to Services - Returns - Returns Dashboard.
STEP 3: Select the period in which you are filing return - Prepare Online - Click on Download Draft GSTR-3B.
The JSON File will now be downloaded to your system.
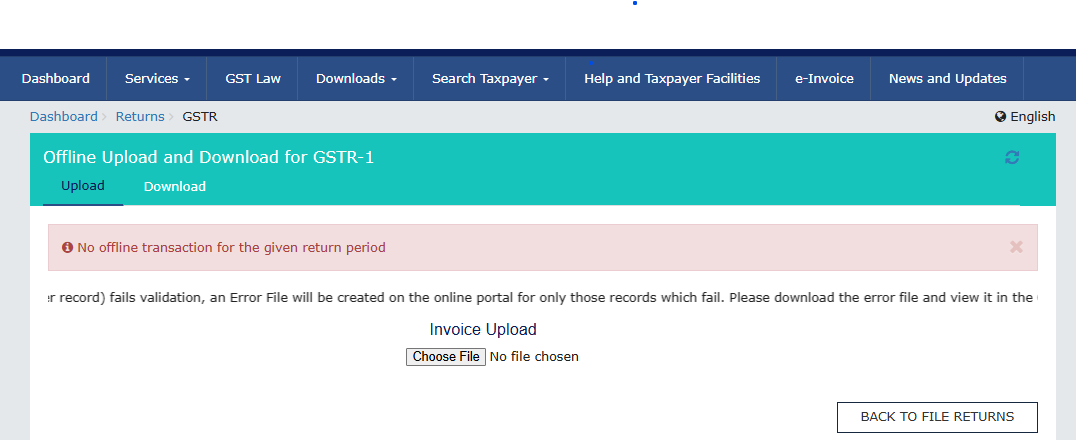
How to Upload JSON File in GST Portal
STEP 1: Go to the GST portal and log in with your username and password
STEP 2: Scroll down to get returns dashboard – select the Financial Year - Select ‘Return period’ - Click Search.
STEP 3: Choose the return which you are filing:
- For GSTR-1 ------ click Prepare Offline.
- For GSTR-3B ------ click Prepare Offline (if available) or Prepare Online.
STEP 4: Click Upload JSON - Choose File –
Select the JSON File generated from GST Offline Utility/Tally/Zoho/other accounting software - Click Open.
The upload will start automatically as you click open.
STEP 5: After uploading the file, click on View Uploaded File. The status will show In Progress/Processed/Processed with Errors.
If status is Processed, proceed to file the return. Before Submitting and filing the return, make sure to verify all invoice data.
If status is Processed with Errors, Click Error Report > download the error JSON > Correct the errors. Generate the new JSON and Re- upload the JSON File.
How to Delete Uploaded JSON File in GSTR-1
GST portal will only show the option to delete the uploaded JSON file if the GSTR 1 is in the preparation stage and has not been filed yet.
STEP 1: Go to the GST portal www.gst.gov.in and log in with your username and password
STEP 2: Scroll down to get returns dashboard - select Financial Year - Select Return period -Click Search.
STEP 3: Click on Prepare Online under GSTR-1 - Click Reset GSTR-1 (Top right Corner )-Confirm Reset - Click YES.
This will delete all invoices uploaded via JSON and all tables populated through JSON upload. After reset, you can upload a fresh corrected JSON.
NOTE: The Reset option disappears once GSTR-1 is submitted. You cannot delete a single invoice uploaded via JSON, only a full reset, i.e., all data will be reset.
Understanding such JSON-based processes for filing returns will help businesses ensure timely compliance and reduce manual errors. Uploading and managing these JSON files simplifies the whole process of GST return filing by enabling smooth, accurate and error-free handling of large volumes of data.
About the Author

Annapoorna
I preach the words, “Learning never exhausts the mind.” An aspiring CA and a passionate content writer having 8+ years of hands-on experience in deciphering jargon in Indian GST, Income Tax, off late also into the much larger Indian finance ecosystem, I love curating content in various forms to the interest of tax professionals, and enterprises, both big and small. While not writing, you can catch me singing Shāstriya Sangeetha and tuning my violin ;). Read more
Clear offers taxation & financial solutions to individuals, businesses, organizations & chartered accountants in India. Clear serves 1.5+ Million happy customers, 20000+ CAs & tax experts & 10000+ businesses across India.
Efiling Income Tax Returns(ITR) is made easy with Clear platform. Just upload your form 16, claim your deductions and get your acknowledgment number online. You can efile income tax return on your income from salary, house property, capital gains, business & profession and income from other sources. Further you can also file TDS returns, generate Form-16, use our Tax Calculator software, claim HRA, check refund status and generate rent receipts for Income Tax Filing.
CAs, experts and businesses can get GST ready with Clear GST software & certification course. Our GST Software helps CAs, tax experts & business to manage returns & invoices in an easy manner. Our Goods & Services Tax course includes tutorial videos, guides and expert assistance to help you in mastering Goods and Services Tax. Clear can also help you in getting your business registered for Goods & Services Tax Law.
Save taxes with Clear by investing in tax saving mutual funds (ELSS) online. Our experts suggest the best funds and you can get high returns by investing directly or through SIP. Download Black by ClearTax App to file returns from your mobile phone.
Office Address - Defmacro Software Private Limited, C 245A, Ground floor, Room No 1, Vikas Puri, West Delhi, New Delhi, Delhi 110018, India
Cleartax is a product by Defmacro Software Pvt. Ltd.
ISO 27001
Data Center
SSL Certified Site
128-bit encryption